Table of Contents
Course development from a design perspective
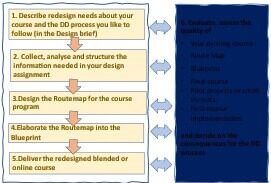
The Basic Course Design and Development process is ....
Design is goal-oriented and normative; this is different from the scientific approach. The teacher designer strives to balance what is desirable from the viewpoint of design, the possibilities of available it (hardware and software) and the characteristics of students and teachers. The thinking of the teacher designer is driven by possibilities, not constraints (Earl, 1987) and Visscher-Voerman (1999).
In design, there is no one best solution. You carefully select the appropriate evidence-based it options and consider using them in the design of the learning process. The concept of evidence-based course design is explained in a separate page. Evaluating your design results using the quality criteria you formulated during the Basic Design Development process is crucial.
The design process ends when the teacher-designers believe their new course has the necessary attributes. The teacher designer should have a detailed overview of the course prepared in the Virtual Learning Environment, combined with most of the assignments and other learning materials. Still, you may introduce necessary changes or additions to the Virtual Learning Environment before or during the course development. One of the most admirable aspects of Virtual Learning Environments is that it is simple to add new exercises, change sequences or add tests.
Different design situations require different design and development activities. An overview is given in Course design, a new approach. The Basic course DD process, as described in the Figure, is meant for the difficult or complex course design situations in which the teacher designer or the teacher’s team must design a completely new course, including new course content, didactics, requirements, etc. You can speak of an open problem which asks a lot of your creativity or a wicked problem. The teachers do not have concrete ideas about a possible learning process and environment. It’s a full-fledged design assignment.

Supporting design tools to be used in the individual phases can be found on the page ‘Step-by-Step Sketch of the Course Design Process and on the page 3. Course Design in Modern Higher Education: A New Approach
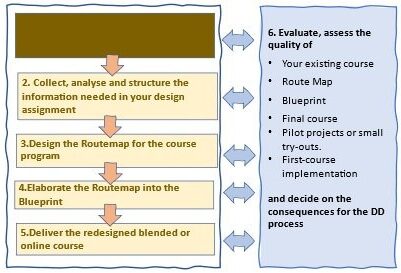
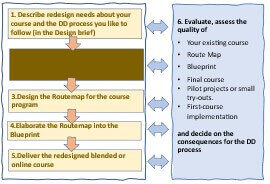
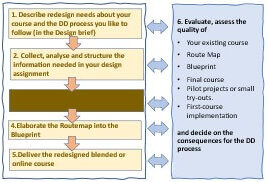
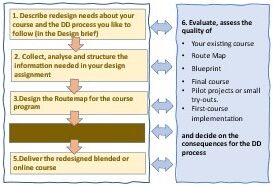
The Basic 6 stage Course Design and Development process
Design activity 1: Prepare and discuss the design brief
- Prepare a design brief to explain the course design task and the course design and development process you want to follow to finish the design task.
- Plan how to work in a teacher team, individually or in another group.
Your design task should be broad enough to support multiple solutions but manageable within your available time. Start by outlining your pedagogical ideas, expected outcomes, desired qualities, design process, and support needed.
Gather clear, concise information to explain your instructional design. Discuss the design brief with colleagues and management to confirm its feasibility and integration into the curriculum.
Supporting design tools can be found on the page ‘Step-by-Step Sketch of the Course Design Process. Stage 1.

Design activity 2: Collect, analyse and structure the information needed
- Make a systematic description of the learning environment, including the diamond diagram.
- Draw the pedagogical concept with existing and new pedagogical measures.
- Formulate the quality criteria you and the management set for the new course.
- Explain the other points that you consider essential.
During the course pDD process, you collect and study additional information necessary in course design. Slowly, you will obtain better insights into the design problem and how the students could master the learning objectives and interact with the teacher, the other students and the learning materials. Using these insights, you should formulate additional quality criteria for the final course activities, materials and learning environment. These quality criteria give practical guidelines to teacher designers to decide when they can be satisfied and finish the course design and development process.
When designing a course, I use various design tools that help me describe the learning environment of the course. This detailed, short and precise elaboration of the learning environment forms a strong foundation for the course design process. Through hyperlinks these design tools are indicated.
Also, supporting design tools can be found on the page ‘Step-by-Step Sketch of the Course Design Process (Stage 2).
Supporting design tools can be found on the page ‘Step-by-Step Sketch of the Course Design Process (Stage 2)

Design activity 3: Design the route map for the course programme
- Elaborate on the learning trajectory by building on the structured information (diamond diagram, pedagogical concept, the learning environment, route map and blueprint).
- Use the possibilities offered by the design process to arrive at appropriate concept ideas and design concepts.
- Select the structure, learning activities and materials.
- Describe the route map concept systematically.
- Find an organiser for your course. Earl (1987) describes this step as the point when all parts of the design puzzle fall into place. To stimulate that ‘click’, look for an organiser. An organiser is a ‘bit of content’ that makes the essence of the learning process visible to you as a designer.
- Evaluate the route map design concept using your selected qualities and the various analyses you have done.
- Select the most promising design concept of the route map.

The design process is discussed in detail on page Course Design in Modern Higher Education: A New Approach. In the figure below, I describe the relevant design substeps.
A strange question. Think about the possibilities for the students to get a good score without doing much. Or, how to cheat cleverly? For example, some students are highly creative in predicting the final test questions. Some students profit from other students’ group work or split the work into projects.
Supporting design tools can be found on the page ‘Step-by-Step Sketch of the Course Design Process (Stages 3, 4, 5, 6, and 7).
Steps followed in course design

Design activity 4: Develop the route map in the blueprint format
1. Describe all topics of the course as described in the route map;
- The necessary learning activities for the students;
- The expected learning results;
- The teaching activities.
2. The use of it and practical exercises;
3. Preparation for the future.
Design activity 4 is reworking the route map in the course blueprint. You can consider the blueprint the definitive lesson plan with concrete learning materials, study assignments and test activities in combination with the expected learning results.
An important question is whether the blueprint sufficiently corresponds with the pedagogical concept, the diamond diagram, the learning environment, the evidence-based educational practices and your formulated qualities.
When will you be done with the blueprint? The design activity ‘making the blueprint’ is complete when you have enough information to begin the following design activity: ‘5. delivery’.
Do not forget to note the ideas that could not yet be implemented but look very promising. For specific ideas, you need extra time. Prepare an action plan to implement these ideas.
Supporting design tools can be found on the page ‘Step-by-Step Sketch of the Course Design Process (Stage 8).

Design activity 5: Deliver the blended or online course

- Work out the final lesson plan, teaching activities and materials for the course;
- Develop new assignments and learning materials;
- Prepare the vle;
- Check the it/infrastructure (e.g. internet, Wi-Fi, vle, etc.);
- Prepare yourself for your work as a teacher in blended and online learning.
- Create a document explaining your decisions
In this design activity, you deliver your ready-made course. The decision must be made whether the designed course can and will be executed.
Then, complete the course in the digital learning environment and check whether all materials and exercises can be used properly. The teacher designer ensures that all activities and materials meet the desired quality standards. Check the quality and the requirements of your course.
It is essential to check whether all the requirements you have formulated will be realised: Do you indeed have enough space in the curriculum and on the computer? Is the connection to the other courses in order? You also check whether the more flexible qualities have been sufficiently achieved.
Supporting design tools can be found on the page ‘Step-by-Step Sketch of the Course Design Process (Stage 9).

Some suggestions for reusing your results of the various official activities.
Create a document explaining your decisions for your self and the design team
Your design vision leads to the decisions you make due to an evaluation. Your vision is reflected in the pedagogical concept, the diamond diagram, the route map, the list of qualities, the blueprint and the final course programme. It is advantageous to substantiate your decisions: the conclusion, the judgment, the reasons for making the decisions and what effect you achieved. Make this a separate document. It will help you remind yourself why the course looks like it does.
An explanation for your colleagues and management
You can also use the list of decisions to explain the pedagogical concept behind the redesigned course to your colleagues and management. Early notice that the product does not meet the formal institutional requirements; there is still time to solve this problem. Unfortunately, if no solution meets the requirement, killing your sweet is typical in designs. Nonetheless, do not forget clever ideas. You never know if you will need them in the future.
Official documents for the students, the faculty, the university and the accreditation organisation.
A practical suggestion is that the descriptions you make at the various stages are beneficial for writing official documents, which usually take a lot of time. Like the study guide, but also for the accreditation, etc.
Design activity 6: Evaluate and assess the quality of the design results and decide on consequences for the DD process
- Evaluate after each design activity whether you are still on the right track with your course design;
- Do you still meet the formulated qualities?
- Assess whether the design and development results fit into the (official) learning environment;
- Decide what adjustments or additional design activities are needed.
- Prepare your evaluation plan for your pilots and the actual implementation
Every design activity has moments to evaluate the results of the Basic DD process.
- Evaluate your current course. You may have an evaluation report or ask the former teacher. What are the positive and negative experiences? Why did the former teacher for the chosen design?
- Evaluate the route map: Does it reflect the diamond diagram, pedagogical concept, quality criteria and requirements?
- Evaluate the blueprint: Does it reflect the diamond diagram, the pedagogical concept, the route map and the qualities?
- Organise pilot projects and small try-outs.
- Prepare an evaluation plan for implementing the redesigned course. in the formal curriculum.
- The SURF group (SURF, 2023a) learning analytics describes the thinking behind learning analytics as a better understanding of the learning process, targeted feedback to students and, ultimately, an improvement in education.
Supporting design tools can be found on the page ‘Step-by-Step Sketch of the Course Design Process (Stage 10)
